


Meticulous planning is crucial for flooring replacement projects. Protect furniture and define work areas for organization. Remove old flooring strategically, preserving underlayment where possible. Install new floors in stages, dividing larger spaces for minimal disruption during renovations.
“Looking to refresh your space without disrupting daily life? Discover the art of replacing flooring in stages. This comprehensive guide unveils a systematic approach, from meticulous planning and protection of furniture to efficient removal of old floors. Learn the tools and techniques for a smooth transition. Then, master the art of installing new flooring, one stage at a time, creating a seamless, beautiful transformation without the usual chaos. Embrace the process, embrace your perfect floor.”
- Plan and Prepare: Protect Furniture and Define Areas
- Remove Old Flooring: Tools and Techniques for Efficient Work
- Install New Flooring: Laying Down a Fresh Surface in Stages
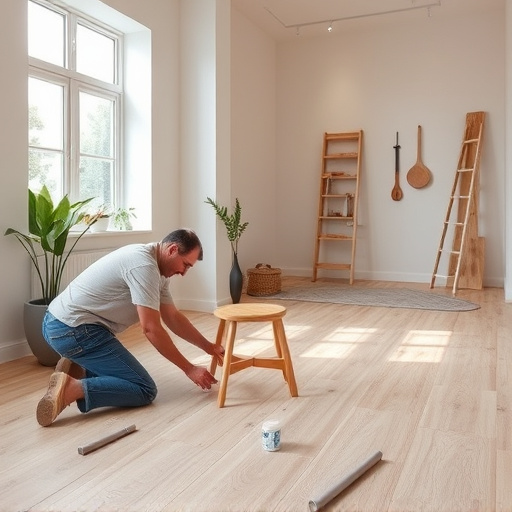
Plan and Prepare: Protect Furniture and Define Areas

Before diving into the flooring replacement process, a thorough plan and preparation are essential. Start by protecting your furniture with drop cloths or plastic sheets to ensure they remain clean and free from dust and debris. This step is crucial, especially if you have valuable items or furniture that requires special handling.
Define the areas where the flooring will be replaced to minimize disruption during the project. For instance, if you’re planning bathroom renovations, isolate the bathroom area with tape and plastic barriers. In whole house remodels, consider dividing spaces into manageable sections. This approach not only protects your belongings but also helps create a more organized and functional space throughout the renovation process.
Remove Old Flooring: Tools and Techniques for Efficient Work

Removing old flooring is a crucial stage in any flooring replacement project, requiring careful planning and efficient techniques to ensure a smooth transition. The first step involves assessing the condition of the existing floor, which may include removing carpeting, vinyl, or hardwood. For larger areas like living rooms or kitchens, where renovations can significantly impact daily routines, strategic disassembly is key. Using tools like utility knives and pry bars, carefully lift and remove flooring materials, taking care to preserve underlayment whenever possible. This meticulous process not only saves time and resources but also ensures a more seamless installation of new flooring in the subsequent stages.
In home renovation projects, especially kitchen renovations, where floors often bear the brunt of wear and tear, efficient flooring removal is a game-changer. Professional renovation services employ specialized tools to expedite this phase, minimizing disruption and maximizing productivity. From powered floor scrapers to heat guns for adhesive removal, these tools facilitate quick and clean separation of old flooring from subfloors, setting the stage for a flawless installation of new materials in the coming stages.
Install New Flooring: Laying Down a Fresh Surface in Stages

When replacing flooring in stages, the key is to work systematically and efficiently. Start by preparing the room for installation. This involves clearing out furniture, taping off edges, and protecting adjacent surfaces from dust and debris. Once the space is ready, begin by laying down any necessary underlayment, ensuring a level and sturdy base.
Next, install new flooring in sections. For larger spaces, divide it into manageable chunks and work on one area at a time. Use appropriate tools and adhere to manufacturer instructions for best results. Overlap each section slightly with the previous one to create a seamless finish. This method minimizes disruption and allows you to enjoy a fresh, new floor surface while gradually transforming your home additions or residential renovations, even during an interior painting project.
Replacing flooring can be a daunting task, but with careful planning and strategic stages, it’s achievable without causing major disruption. By protecting furniture, defining work areas, efficiently removing old flooring, and installing new flooring in manageable stages, you can transform your space while maintaining comfort and minimal inconvenience. This step-by-step approach ensures a smoother, less stressful flooring replacement process for any do-it-yourselfer to tackle.